Pages

Showing posts with label Science 2020. Show all posts

Tuesday, February 16, 2021

Physical And Chemical Change

Hypothesis: I think this experiment is gonna show chemical changes. 

Equipment: 
  • Sample of ZN 0 (Zinc Oxide)
  • Heat Source - Hot Plate
  • Scales
  • Heat proof container - Evaporating dish 
  • Tongs
  • Heat proof mat
Method: 
  1. Prepare one sample of ZN 0 in an evaporating dish. 
  2. Weigh the ZN 0 and container - record weight.
  3. Heat container and ZN 0 on hot plate.
  4. Observe any changes - use phone for before and after photos 
  5. Take of heat and put on heat proof mat.
  6. Let cool - observe - photos
  7. Re weigh
Results: Before we started the experiment we take the weight of the bowl and the weight of the Zinc. The bowl weigh is 5 grams while the Zinc weight is just 2 grams. We put the bowl with the powder in it on the heat to see the result. It takes time to see any changes that is happening. After some time we started to see that colour changing on the Zinc powder. It's starting to change the colour into yellow but the original colour is white. Basically that is the only changes that we saw in this experiment. 


Conclusion: My hypothesis is it's gonna be a chemical changes. After this experiment I saw that my hypothesis is wrong. As I said for the result, the whole experiment didn't gave us a lot of changes and it's just a colour. So this experiment is shows physical changes.

Wednesday, July 1, 2020

Refraction through Lenses

Aim: To investigate how different types of lenses refract light.
Equipment:

  • Triple-Slit Ray Slide
  • Power Supply
  • a concave lens 
  • a convex lens
Method: 
  1. Set up the ray box, triple slit ray slide and power supply.
  2. Place the convex lens in the space below. Place the ray box at the top of the page and shine the three rays of light at the lens. Make sure the central light ray hits at 90 degrees as indicated in the diagram.
  3. Carefully trace the direction of the incoming and refracted rays.
  4. Repeat using the concave lens.
Difference Between Concave And Convex Lens | Aiye Samjhein

Conclusion: 
When light passes through this type of lens, the rays all move away (diverge) from each other. One use of these lenses is in security peepholes in a door so that a person inside a room can see who is at the door without having to open it.

1. The lens described in the paragraph above is a concave lens.

When light passes through this type of lens, the rays all move towards (converge) each other. One use of these lenses is in a camera, to focus the light onto the film or digital sensor. Magnifying glasses also use this type of lens.

2. The lens described in the paragraph above is a 

Tuesday, June 30, 2020

Science - Refraction and Reflection

Aim: To investigate how light is affected by changing the substance it is travelling through.
Equipment:

  • Ray box
  • Power source
  • glass or perspex block, 
  • single-slit ray slide.
Method: 
  • Collect the equipment from your teacher, and set them up to produce a single beam of light.


Part A


Angle of Incidence (i)Angle of Refraction (r)
                            10 degrees 6
                            20 degrees13
                            30 degrees19
                            40 degrees23

Part B:

Angle of Incidence (i)Angle of Refraction (r)
                            10 degrees 7
                            20 degrees14
                            30 degrees20
                            40 degrees24


Wednesday, June 24, 2020

Dissection of an Eye

Aim: Be able to see and identify the different part of the eye and to see the actual look of different part of it
Equipment:
  • Dissecting Scissors
  • Tweezers
  • Newspaper
  • Gloves
Method:
  • Remove any fats that left on the cow eye.
  • Poke the corner of the eye, be careful so the liquid inside will not explode all over you.
  • Cut the lens of the eye so you can see the things inside of it.
  • After you cut the lens cut the eye that will help you so see the whole thing inside it.
  • Once you cut all of it, you will see the different thing and liquid that the eye containing.
Findings:


                  After we finished the experiment we saw the different part of the eye. We also discover and saw the cool part of there which is the " Tapedum Lucidum". But while we are doing the experiment we have a hard time by poking the eye because it is so squishy and we are scared to get the liquid all over our clothes.

Conclusion: For me this experiment is really interesting because I don't have an idea what does it look like and also I find this experiment really helpful because doing a dissection of an eye will help us more and give us more simple detail to know the different parts of an eye.

Wednesday, June 3, 2020

Marshmallow Shooter

Hypothesis: I think this activity will be successful and we are be able to make a marshmallow shooter. 
Equipment:
  1. 1 clean cup
  2. 1 balloon
  3. 1 pair of scissors
  4. 1 marshmallow
Method:
  1. Cut the bottom off the cup with the scissors.
  2. Cut the balloon half way along the neck.
  3. Stretch the balloon over the bottom of the cup.You may find this a bit tricky to start with, but after making a few it becomes easy.
  4. Pop your marshmallow into the cup.
  5. Fire the missile by pulling the knotted neck of the balloon back and letting it go. You will be surprised at how far it can travel
  6. The open end will fold together when you stretch the balloon, but this will not stop the missile from firing.
Results (Describe what you saw, take a pic/video):


Discussion (What were the energy changes happening,
explain what you saw): This activity has kinetic and elastic energy.
It has elastic energy because while doing this activity we have
to pull the balloon we are making a motion. And it has a kinetic
energy because when we released the balloon the marshmallow
flew away from the cup.
Conclusion (Was your hypothesis correct, did the experiment work?): Our experiment work because once we are done to our experiment and try it to a marshmallow we made it flew away by doing to right step that we have to do. We pull knot that we created to the balloon and release it after that the marshmallow flew away. 


Wednesday, May 20, 2020

Science - Lab safety

What is safety?
Safety is to protect yourself from harm and danger.

How to keep yourself safe;
  • Put your bags under your desk.
  • Do not run across the classroom or on laboratory.
  • Don't play with equipment.
  • Wear your safety glasses when you are using fire.
  • For girl, tie your hair up when you are doing experiment.
  • Don't eat or drink inside the laboratory.
  • Wear the proper gear.
What is hazardous?
When an object can harm or dangerous for you.

What is meniscus?
The curved side of a liquid when it is in a beaker.


Monday, March 16, 2020

Chromatography Experiment

Aim: To separate the different pigments using from the ink.
Hypothesis: I think when the water reach the ink it will starting to go up and the ink will start to fade.
Method :

  1. Put 50 Ml of water on the beaker and make sure that its exactly 50 ml.
  2. Put a dot on the bottom of the filter paper. Put it in center.
  3. After you put the dot put the filter paper into the water but make sure only the edge of it is on the water.
  4. Fold the top of the filter paper to avoid the chances that the filter paper will fall into the water.
  5. Leave it for a couple of minutes and start to observe the process.
Result:
The first time that we try I used the color pink but when we needed to take it out into the water I notice that nothing change from it. The color didn't change at all instead the color just go up and started to fade.
For the second one the teacher said that we need to use color black instead of any other colors, this experiment is more better that the first one because I can see different colors. 
  

Discussion: I think the second experiment is more better than the first one because we can see more different colors than the first one. The first one we can just see one color and the same color but the second one shows a lot of different colors. I think that it because we use a dark color and for the first one we use a brights color. I really enjoy this experiment and I love to do more.

Sunday, March 15, 2020

Evaporation Experiment

                      Separating a Mixture using Evaporation

Aim: We are trying to separate the mixture so it will end up on something solid and without liquid on it.
Hypothesis: I think after this experiment the liquid on the mixture will evaporate.
Equipment: Copper sulfate solution, 250mL Beaker, heat proof mat, evaporating basin, element. 
Method:
Set up element
  1. Add 50mL of hot water to the beaker and place on the element.

  1. Add copper sulfate to the evaporating basin until it is quarter full.

  1. Carefully, place the evaporating basin on top of the beaker.

  1. Turn on the element to 8

  1. Heat the solution until most of the solvent has been evaporated and crystals of solute are forming.

  1. Turn off the element- careful not to touch it as it will be hot for a long time.

  1. Turn off the heat - careful not to touch the equipment as it will be hot for a long time.

Observations:  Once we put our mixture on the stove and the water starter to boil the sulfate started to smell weird and the copper sulfate was slowly turning into crystals and there was also steam.

Conclusion: In the end of the experiment the small part of the copper sulfate that we used turned to a solid and water started to evaporate.

Discussion: The purpose of this experiment is to evaporate the water and to observe if the copper sulfate will turn into crystals.

Evaluation: I think our experiment worked but for me it's better if we observe it more, since we didn't observe it that much because we are running out of time we probably miss some of the process that is happening while the water is boiling and how the copper sulfate turns into crystals.

Monday, February 17, 2020

Science Dissolving Experiment

Aim: We are gonna see and investigate the solubility of baking soda and table salt to see which of these two is most soluble in water.

Hypothesis: I think that baking soda is more soluble in water more than salt.

Equipment: A 250 ml beaker, 100 ml measuring cylinder, salt, baking soda , a string rod, a teaspoon and a ruler.

Method:
  1. Put 100 ml of tap water into the beaker.
  2. Add a level of teaspoon of baking soda. A level teaspoon is obtained by running your rules across the edges of the teaspoon. 
  3. Mix and stir the solution unlit the baking soda has dissolved.
  4. Keep doing the step 2 and 3 until no more baking soda will dissolved into the solution.
  5. record how many teaspoon of baking soda we put into the solution.
  6. Do the experiment again and do it with table salt instead of baking soda.
Result:

                               SoluteNumber of teaspoon that dissolved in 100 ml of water 
Baking Soda
15
Salt
                                    22


Discussion:
This experiment is all about dissolving, we did two same experiment but two different solutes. We try to mix baking soda and salt into the water to see how many teaspoon of baking soda and salt that dissolved in water. After the experiment we put more salt because the salt dissolved faster that baking soda.
Image result for science dissolving
Conclusion:
At first I thought that baking soda is going to dissolved more faster compare in salt. But when we did the experiment the salt dissolved faster than baking soda. This experiment is really fun and helpful because it can help you to know more about science.


Friday, July 26, 2019

Hurumanu - Recycling

Aim: To learn practical ways of recycling so that we can make our world a better                                                                       place.
Plastics: Recycling plastic help us to avoid the air pollution because we don't need to burn them, instead we can make a new thing from this things.

Paper: We can make new things from the paper and avoid cutting down the trees.
Steel: We don't need to burn a coal and avoid the carbon dioxide.
Video questions:

What is Zero Waste?
What can we do on the planet?
  1.   Instead of throw at the trash the broken appliances we can repair it so we can use it again.
  1.   Recycling the plastics from the trash to make new things and new products.
  1.   Instead of putting the organics on the trash we can put it on the soil       because they helping the soil t be more healthy for the plants.
  1.   Put the right rubbish at the right rubbish bin to avoid the carbon dioxide on the air.
  1. Make Plants.
  1. Have Zero Waste.
What is a carbon footprint?
How can you make your Carbon Footprint smaller?
                       ENERGY SAVING TIPS FILM
  1.  Turning off the lights when there is no one using it and turn it off when you are sleeping.  
  2.   Put the rubbish at the right rubbish bin so the thing that we can recycle, organics is on the same rubbish bin.
  3.  Reduce playing some video games to reduce the electricity that we are using every day.


How can we prevent climate change though recycling these products?

Cycling or walking: We don't need to use a car every time we need to buy something specially if the store is just to our house and the we can avoid the dirty smoke that coming from the cars.


One of the quickest ad cheapest ways a community can immediately reduce climate impact.


What do we need to recycle?
We need to recycle the plastics and the other rubbish that we can use to make new things or the things that we can't burn to avoid a pollution on the air and the water.

What does recycling do?
It reduce pollution, help to avoid habitat distraction, reduce the carbon dioxide and we can do new product using plastic bottles and any kind of rubbish that we can recycle.

How much of our rubbish is food scraps?
We have 42% of our food rubbish is food scraps.

What does soil do to carbon dioxide in the atmosphere?
It help us to reduce carbon dioxide.

What do we need to do?
We need to learn how to do recycling because recycling is have big contribute for us to avoid the climate change.


Name 4 of the tips.

 www.footprintcalculator.org/signup  

Image result for rates of decomposition
AT WHAT RATES DO DIFFERENT ITEMS DECOMPOSE?
MY INVESTIGATION.
Name: 
  • Aluminim can
  • Platic bottles
  • Milk carton
  • Plastic bag

  • Glass bottle

Choose 5 items from the list and investigate them. 
You need to answer three questions.y

1. How long do they take to decompose? 
  • Aluminum can take 200-400 years before it become decompose.
  • Plastic bottles takes 400-500 years before the decomposition
  • Milk carton takes almost 5 years before is decompose.
  • Plastic bag takes 10-20 years if decomposition.

  • Glass bottle takes 500 years but because it makes of glass there is a possibility that it can't be decompose.
2. What resource / fossil fuel are they made from?
  • Aluminum can are made by metal, iron and coal.
  • Plastic bottles have a fossil fuels like liquid petroleum gases, natural gas liquid and natural gas.
  • Milk carton are made of paperboard, coated by waterproof plastic.
  • Same as plastic bottles plastics bags is made of  liquid petroleum gases, natural gas liquid and natural gas.

  • Glass bottle is also made of natural resources like silica sand and limestone.
3. How is this resource recycled?
  • It then goes through a re-melt process and turns into molten aluminium, this removes the coatings and inks that may be present on the aluminium.
  • We can recycle them by melting the plastic bottles and make to anew products that we can sell to earn an money.
  • They are separated from other types of paper and sent out to paper mills, which turns them into new products. 
  •  They can be melted down and used to create new batches of plastic bags. 

  • Glass is sorted by colour and washed to remove any impurities. The glass will be then crushed and melted, and then be molded into new products.  
4. How does making this object contribute to climate change?
  • If we melt a aluminum can this is going to produce a different gases that will help the temperature become hotter.
  • Burn plastics bottle will cause of the air pollution so if we can recycled it we need to do it so we can use them and to avoid a air pollution.
  • They don't contribute to climate change. But the dairy cows and their manure produce gas emissions, which contribute to climate change.
  • Like the plastic bottles if we burn it it's the cause of the air pollution.

  • While recycling glass and get emitted during the production of glass. The materials can contribute to acidification.

Monday, July 22, 2019

Hurumanu - The Water Cycle

               AIM: TO LOOK AT THE WATER CYCLE AND HOW                         CLIMATE CHANGE IS AFFECTING IT.


Definition:

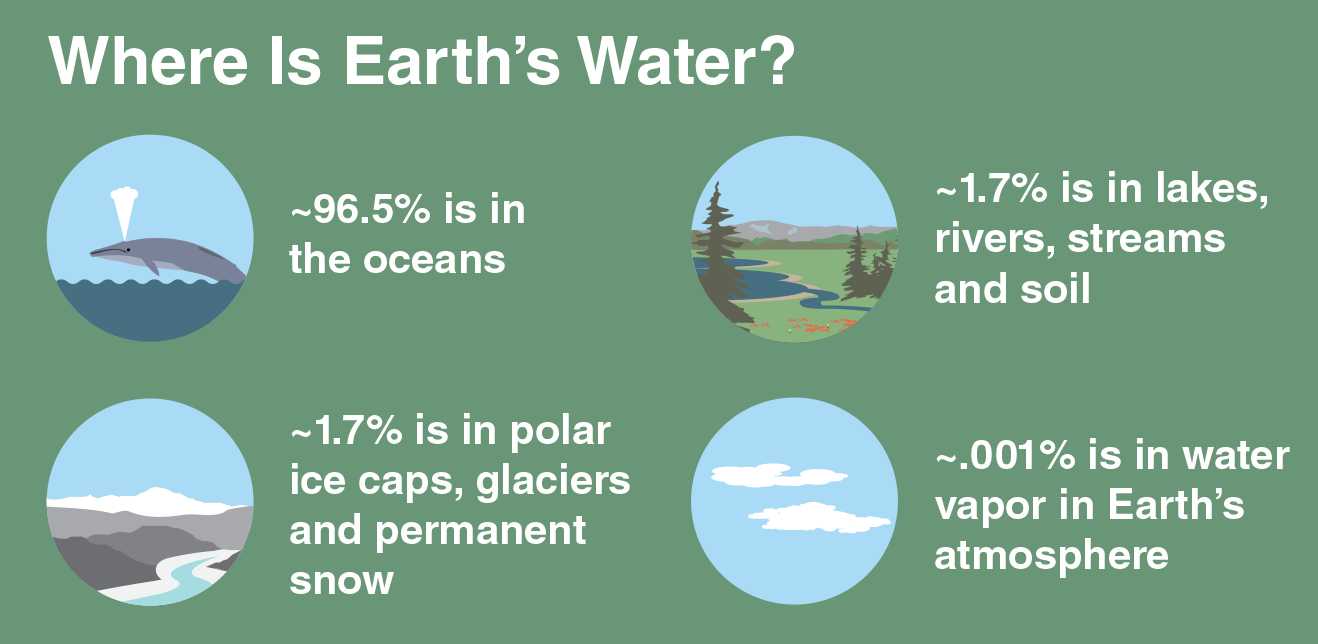
A green box with icons and white text. Text reads: Where is Earth's Water? 96.5 percent is in the oceans; 1.7 percent is in lakes, rivers, streams, and soil; 1.7 percent is in polar ice caps, glaciers, and permanent snow; 0.001 percent is in water vapor in Earth's atmosphere

Scientific words:


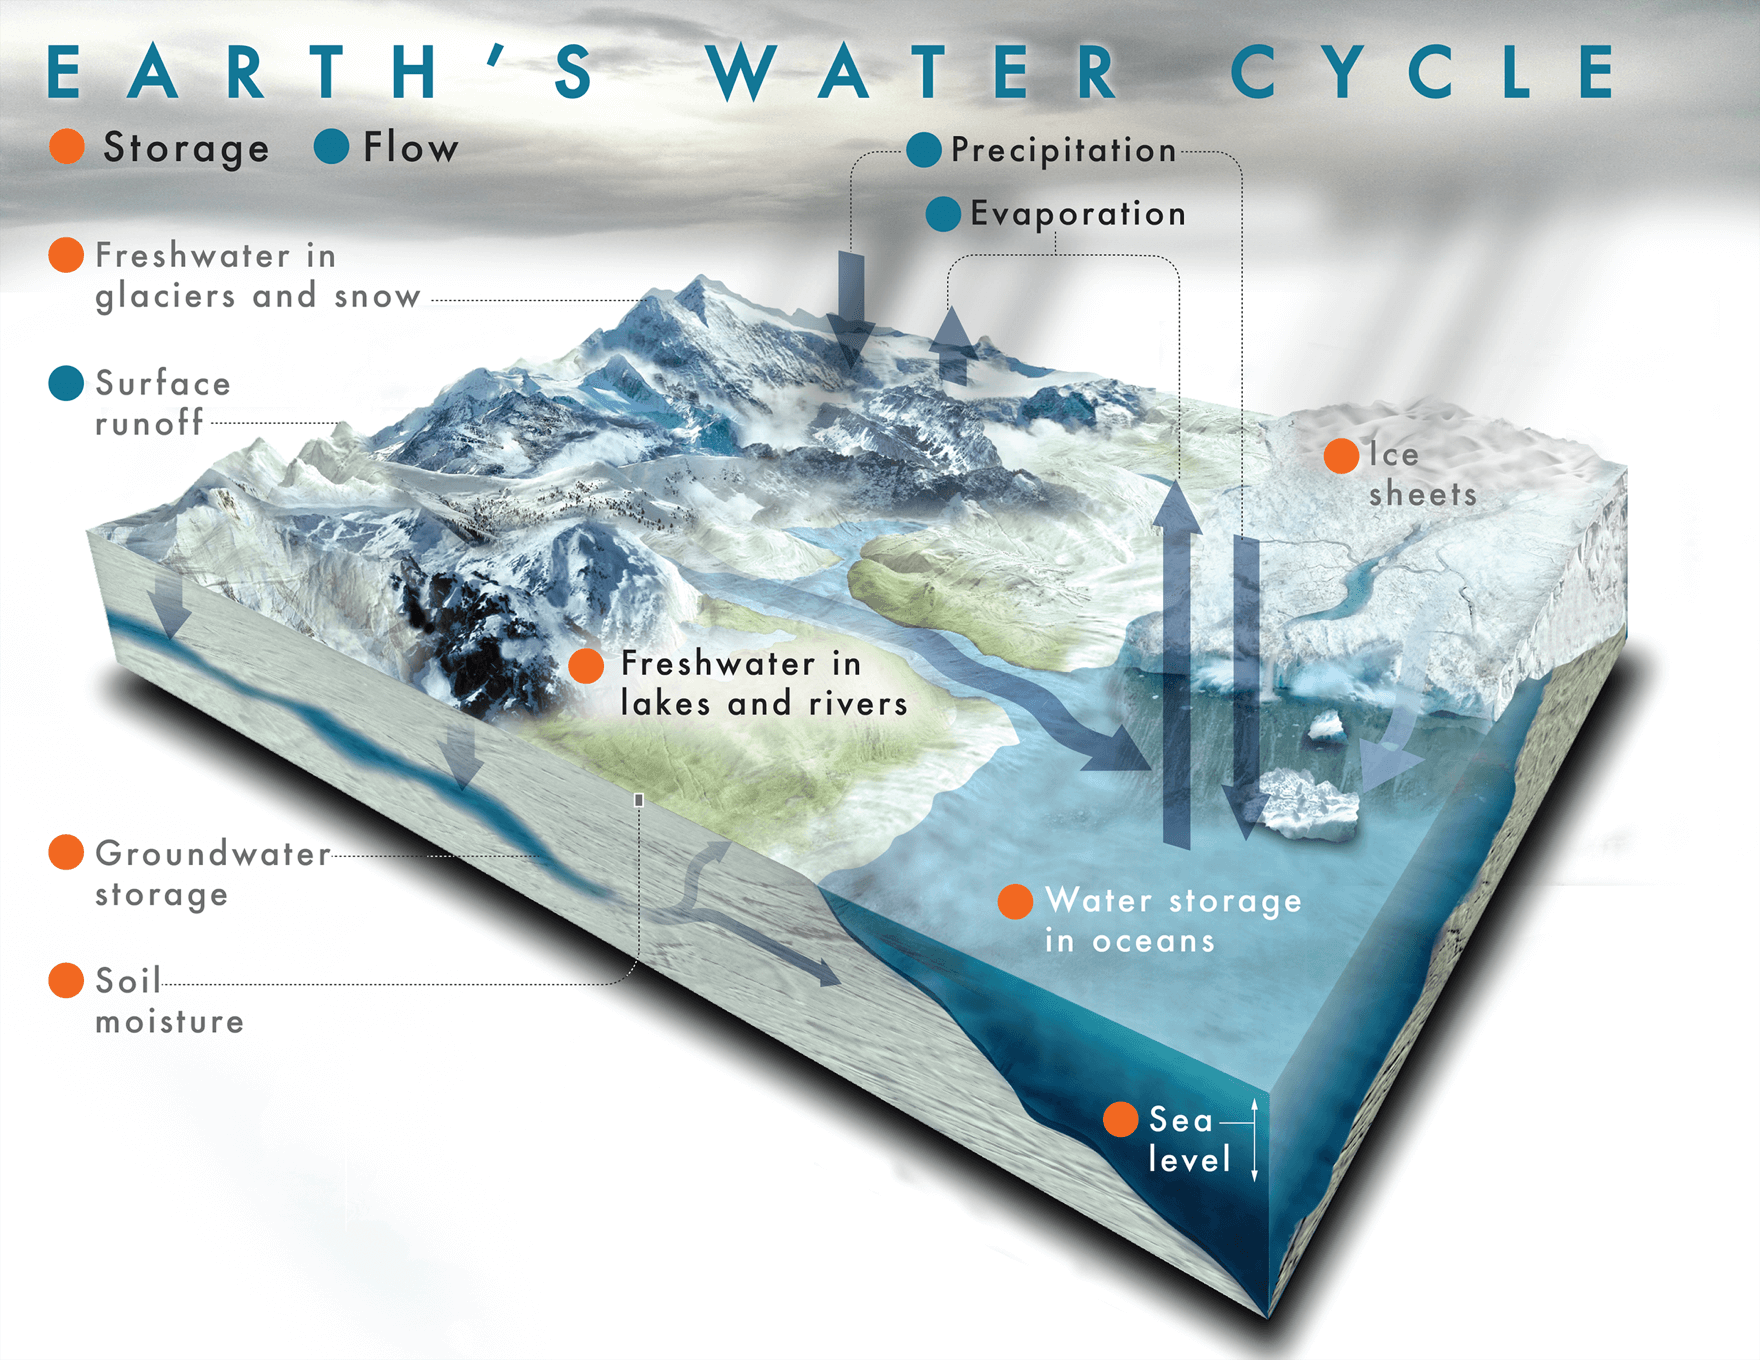
  • Evaporation. When water is heated by radiant energy it turns into water vapor.
  • Transpiration. Evaporation from plants.
  • Condensation. When water vapor cools, molecules join together and form clouds.
  • Precipitation. When clouds get heavy the waters falls as rain, sleet, hail, or snow.
  • Acidification: the action or process of making or becoming acidic.

We will be conducting an experiment that looks at the different ways that climate change is affecting the water cycle.
An illustration of the water cycle showing how water travels from rivers and streams to clouds to snow and back again
Material:

  1. Vivid Marker
  2. Plastic bag (ziplock)
  3. 1 cup of water and half a cup of water
  4. Food colouring
  5. Litmus paper
Steps:
  1.  Grab a plastic bag (ziplock) it should be partly large.
  2.  Grab a pen and start to draw the clouds, water, trees, and words.
  3.  Pour a cup of water into the bag not too much.
  4.  add at least two drops of food coloring the color of your choice but ideally blue
  5.  Stick the bag on a window where the sun comes through regularly.

THE WATER CYCLE EXPERIMENT

Bag 1: Normal Water cycle
Bag 2: Water cycle with CO2 added: like Oceans in climate change
Bag 3: Water cycle with ice added: like Antarctica in climate change


The Water Cycle: Bag 1
CO2 Water Cycle: Bag 2
Acid
Desert Water Cycle
Bag 3
Does it cycle?
YesYesYes
Amount of Water
222
Acidity
121

Key: Water and acidity amount: 1 = none 
2 = small drips
3 = large drips

Other comments:

  1. Water Cycle: Bag 1 - I had no acidity and the water cycled in bag 1.
  2. Water Cycle: Bag 2 - It has a small drips of acidity and small drips of water.
  3. Water Cycle: Bag 3 - It don't have any amount of acidity.

Conclusion: For our science hurumanu we did 3 bags of different water cycle, first water cycle that we did is just a water, second one we use a soda water and the last one we use a sand a small amount of water and the water cycle on bag 1 and bag 3 don't have any amount of acidity. Water cycle on bag 2 have a small drips of acidity. All of them have the same amount of water on their bag.


TODAY YOU WILL BE INVESTIGATING THE EFFECTS THAT CLIMATE CHANGE HAS ON THE WATER CYCLE.

  1. Using your SOLO hexagons poster write a paragraph about the different aspects of climate change.
  2. Write about the following Climate Change concepts:
You can do these by powerpoint, embedding a movie , on your blog, on a doc or any other form of presentation. It is up to you.


ACIDIFICATION definition:

 Is refers to a reduction of the ocean over an extended period of time. these changes in ocean chemistry can affect the behavior of non calcifying organism as well.


Picture:

Image result for AcidificationImage result for Acidification

HOW does acidification affects climate change?

Ocean acidification refers to decreasing levels in the ocean which makes the sea more acidic. It takes long time to change in seawater because of the absorption of carbon dioxide from the atmosphere.

DEFORESTATION Definition:

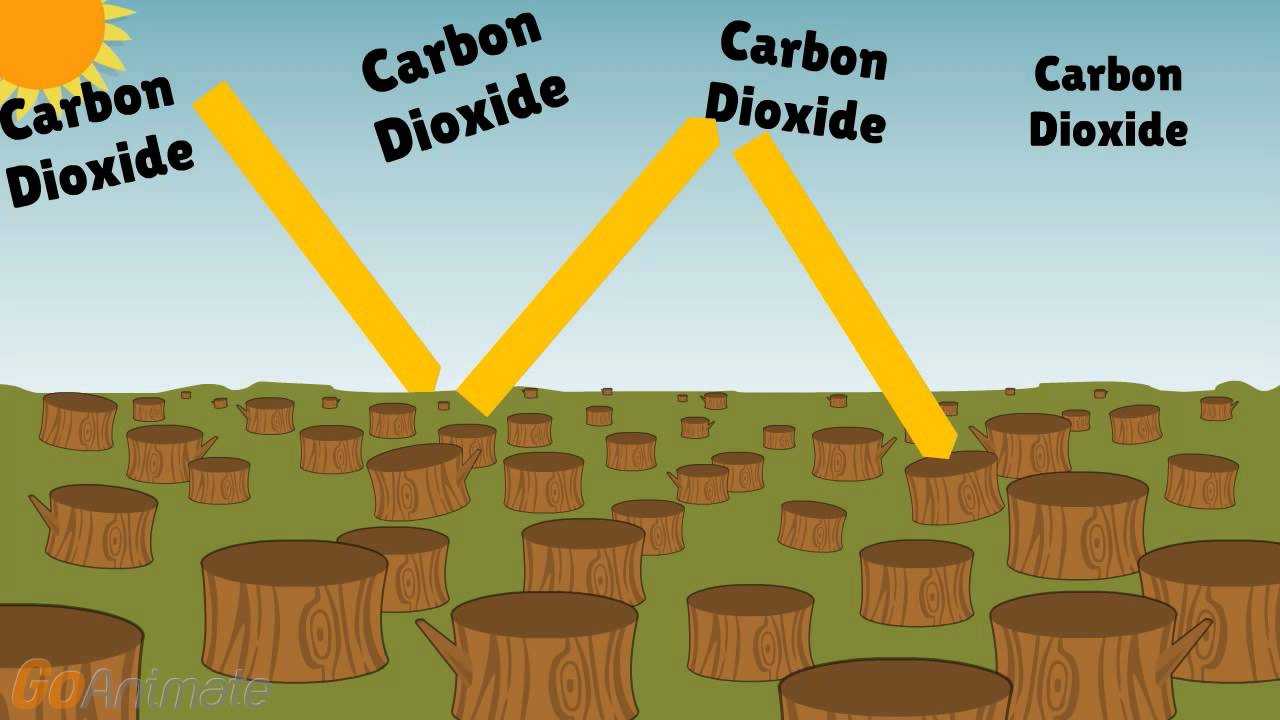
Is the permanent destruction of forest, like cutting down the trees to use them for the other activity of human that needed to have a wood and some of the people that cutting the trees is selling them to make a money.


Picture:


Image result for deforestation

Image result for how does deforestation affect climate change


HOW DOES DEFORESTATION AFFECT CLIMATE CHANGE?

Trees is helping us have a fresh air and to absorb the carbon dioxide but if we don't have a trees the temperature is going to get hotter and hotter and it will cause a bad effect to climate change because earth hate the atmosphere is it's to hot.

ICE CAP MELT: 

Ice melting is happening because of the overall increase by global temperature. It is where icecap melts because of climate change which causes the water to get warmer and when the sea level rises it is much easier for it to melt.


Picture:


Image result for ice cap meltingImage result for ice cap melts diagram


HOW DOES ICE CAP MELT AFFECT CLIMATE CHANGE?
Because icecaps are a dark color it absorbs more sunlight and also releases it in the air which helps climate change and that heat warms the air and melts the icecaps. 

WATER VAPOUR: 

 Water vapor is a gas it is caused by evaporation or boiling water but that is aqueous vapor water vapor is invisible.


Picture:

Image result for water vapour worksImage result for water vapour works

HOW DOES WATER VAPOUR AFFECT CLIMATE CHANGE?

When we dump greenhouse gas into the air, of course, you know it makes the air humid and warmer but because of water vapor which is a greenhouse gas itself helps the carbon dioxide which makes it worse.